BeanFactory is lightweight because
it does not create the objects while reading the xml ,the objects are created
while calling getBean() secondly,it does not support i18N.
ApplicationContext creates all the objects
while reading xml file and it supports Event Handling and i18N that’s why it is
heavy weight.
If you want any bean to be declared as
singleton then use scope="singleton" or
singleton="true" (Attribute is version based).
To execute some logic
automatically once the object is constructed after injecting the values [ it’s
not possible using static because static is executed while class is loading] or
to throw an Exception if we are not injecting required values for beans
we can implement afterPropertiesSet() method of IntializingBean .
Ex1:-
JndiObjectLocator implements IntializingBean
{
afterPropertiesSet()
{
throw Exception;
}
}
JndiObjectLocator implemented afterPropertiesSet() method to throw an
exception if we are not injecting the dependent jndi name value.
<bean
id=“datasource” class=“…JndiObjectFactoryBean”>
<property name=“jndi”>
<value>MyJndi</value>
</property>
</bean>
here JndiObjectFactoryBean
extends JndiObjectLocator so if your not injecting jndi name to the
JndiObjectFactoryBean then afterPropertiesSet() method ofJndiObjectLocator will
throw an Exception.
LocalSessionFactoryBean implements
afterPropertiesSet() method of IntializingBean to create sessionFactory object
after injecting the ORM details and it implements the destroy() of
DisposableBean to close SessionFactory object.If we are not injecting
sessionFactory to HibernateTemplate then to throw an llegalArgumentException
they are implemented afterPropertiesSet().
We can write init() ,destroy() methods in the bean
without implementing any interface but we need to configure those using init-method
and destroy-method attributes, here we can give any name init() or
initTest() etc.
Ex:-
<bean id=“xx” init-method=“initTest()” />
If any Bean is implementing DisposableBean then we
need to implement destroy() method,we can also write another destroy method
using destroy-method =“destroyTest()” attribute but
first lifecycle method destroy() is executed then destroyTest() is
executed.
If Bean is implementing
IntializingBean(afterPropertiesSet()) and you are written
init-method=“initTest()” then first afterPropertiesSet() is executed after this
initTest() is executed.
How to make your bean as abstract:
If some of the properties are common for two or more
beans instead of configuring in each bean we can configure the common
properties in one bean and make the bean as abstract using abstract=“true”.
We can
utilise the common properties in other beans using parent attribute
Ex:-
<bean id="ParentCB"
class="org.spring.controller.MainController"
abstract="true">
<property name="initRequestAction" value="init" />
<property name="homePageView" value="home"/>
</bean>
<bean id="LoginCB"
class="org.spring.controller.LoginController" parent="ParentCB">
<property name=“successView” value=“home”/>
</bean>
<bean id="PersonMaintainCB"
class="org.spring.controller.PersonController"
parent="ParentCB">
<property name="successView"
value="person"/>
</bean>
here initRequestAction and homePageView properties
are common for all the controllers.
How to call static factory method:
To call static method we are using
classname and the method returns some value based on return
type, to do this in spring use factory-method attribute
class Employee
{
public static String getEmpName()
{
return “Ram”;
}
}
<bean id=“empFactory” class=“Employee”
factory-method=“getEmpName “>
</bean>
The above configuration will not return the Employee
object it will return the static method(getEmpName())return value.
How to call non static factory method:
To get the non static method return value first
configure the bean because it’s a non static method, next configure
another bean using factory-bean and factory-method attributes.
Ex:
class
Employee
{
public String getEmpName()
{
return “Ram”;
}
}
<bean id=“employee” class=“Employee”/>
<bean id=“empFactory”
factory-bean=“employee”
factory-method= getEmpName”/>
Use of Autowiring:
Instead of configuring the dependent properties we can
use autowiring.
i) autowire=byName :
Ex: Class Service
{ private Dao dao;
void
setDao()
{
}
}
Without Autowiring :
<beans>
<bean id=“dao” class=“. .MyDao”/>
<bean id=“service” class=“..MyService” >
<property name=“dao”>……………….this code is not require in autowiring .
<ref bean=“dao”/>
</propety>
</bean>
</beans>
With Autowiring :
<bean id=“dao” class=“. .MyDao”/>
<bean id=“service” class=“..MyService”
autowire=“byName”/>
ii) autowire=byType:
if the setter method name is not based on the
property then byName will not work(choose byType here)
Ex:- public class Service
{
private Dao dao;
public void setDaoOne(Dao dao)
{
this.dao=dao;
}
}
Note: byType means not based on the
arg-type.
Bean Configuration With Autowiring:
<bean id=“dao” class=“. .MyDao”/>
<bean id=“service” class=“..MyService”
autowire=“byType”/>
iii) autowire=constructor:
Ex:- public class Service
{
private Dao dao;
public Service(Dao dao)…………constructor
{
this.dao=dao;
}
}
With out autowiring :
<bean id=“dao” class=“. .MyDao”/>
<bean id=“service” class=“..MyService”>
<constructor-arg>
<ref-bean=“dao”/>
</constructor-arg>………… This code is not required
</bean>
Note:in autowiring <constructor-arg>
configuration is not required.
With autowiring:
<bean id=“dao” class=“. .MyDao”/>
<bean id=“service” class=“..MyService”
autowire=“constructor”/>
iv) autowire=autodetect:
If there is any arg -constructor then
autowire=“constructor” is applied otherwise autowire=“byType” is
applied
Note:
1.If there is
any complex dependency then don’t use autowiring it will give ambiguty
problems.
2.If you want
to apply autowiring for all beans use default-autowire inside <beans> tag
ex: <beans
default-autowire=“byName”>
configure the required
beans here…….autowire will apply for all.
</beans>
How to configure Collection objects:
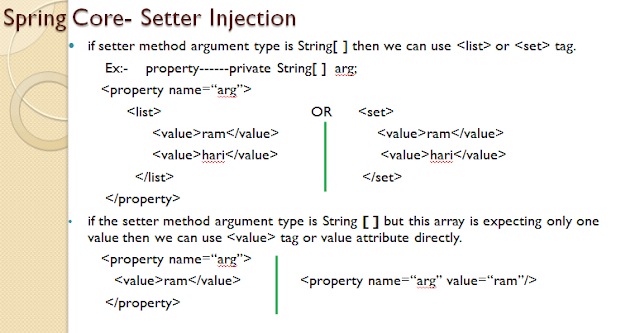
If the setter method arg-type is
String[] then we can use <list> or<set>
If the setter method arg-type is List then
we can use <list>
If the setter method arg-type is Set then
we can use <set>
If the setter method arg-type is
Properies use <props> and to define each key-value
pairs using <prop> tag inside <props>
Ex
public class
Employee
{
private Properties employeeProperties;
public void setEmployeeProperties(Properties employeeProperties)
{
…………….
}
}
<bean id=“employee” class=“..
Employee”>
<property name=“employeeProperties”>
<props>
<prop key=“name”>
<value>Kathy</value>
</prop>
<prop key=“id”>
<value>1771</value>
</prop>
</props>
</property>
</bean>
If the setter method arg-type is Map
then we can use <map> and inside map each entry using <entry>
tag
Public class Employee
{ private Map
employeeMap;
public void
setEmployeeMap(Map employeeMap)
{…………….}
}
<bean id=“employee” class=“..
Employee”>
<property name=“employeeMap”>
<map>
<entry key=“ename"><value>Jay</value></entry>
<entry key=“eid”><value>1771</value></entry>
</map>
</property>
</bean>
Property Name Space:
<beans
xmlns="http://www.springframework.org/schema/beans"
xmlns:xsi="http://www.w3.org/2001/XMLSchema-instance"
xsi:schemaLocation=http://www.springframework.org/schema/beans
http://www.springframework.org/schema/beans/spring-beans-2.5.xsd
xmlns:p=“http://www.springframework.org/schema/p“ />
Public class Employee
{
private
String ename;
private int
eid;
//setters
and getters;
}
<bean id=“employee” class=“..
Employee” p:ename=“Jay” p:eid=1771 />
s


